Prepair the wood
Prepair the wood
Since Grade A plywood is usually sanded, it’s not necessary to sand the surface before painting.
If your sheet of Grade B plywood isn’t sanded, you must be very careful not to remove too much material while sanding.
Remember that the layer of wood veneer on top is as thin as 1/16 of an inch.
To save time, it’s best to start off with Grade A plywood.
If you must sand the plywood, lightly scuff the surface with 120-grit sandpaper.
Next, wipe the wood down with a rag soaked in mineral spirits.
Once the wood is dry you can apply primer with a brush or roller. Once the primer has cured, apply the paint!
How to Stain Plywood
Staining plywood is a little trickier since plywood tends to soak up stain at different rates, which results in a blotchy appearance.
For best results, take your time and be willing to spend some extra money on quality pre- and post-staining products.
BEST STAIN FOR PLYWOOD
You may use oil- or water-based stain. We recommend oil-based stain for any projects that will be outside.
Pre-stain conditioner can help prevent the blotchy appearance and is an important step for a better-looking finished product.
You can also use a gel-stain for a more even-looking finish.
If necessary, follow the sanding instructions we outlined above.
Once that’s finished, you’ll need a lint-free cloth or a paintbrush and a pair of rubber gloves to apply the stain.
To begin, wipe the wood down with a rag soaked in mineral spirits.
Once the wood is dry, use a lint-free cloth or a paintbrush to apply stain conditioner if necessary.
Follow the manufacturer’s instructions for best results.
APPLY THE STAIN
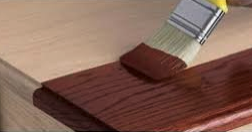
Once the conditioner is dry, apply the stain with a different rag or brush.
The longer the stain stays on the wood, the darker the color will be.
This could be anywhere from 10 seconds to 15 minutes depending on the stain.
Once you’re satisfied with the color, wipe off any excess stain that did not soak into the wood.
Allow the remaining stain to dry, this could take about 12 hours, but always read the manufacturer’s instructions.
APPLY THE FINISHING TOUCHES
Once the stain is dry, you’ll need to cover the wood with polyurethane or lacquer to protect the stain and prevent it from rubbing off.
Both products are available in spray cans for smaller projects.
They’re also available in different sheens depending on how glossy you want the finished product to look.
Spray on at least three coats of the poly or lacquer in a well-ventilated area according to the manufacturer’s instructions.
Business Address:
12 dalebrooke crescent
Freeway Park 1459
Gauteng
Quick Links
Related Articles

How Much Does it Cost to Fully Renovate a House in South Africa?
Remember to plan ahead, stick to your budget, and work with a reliable contractor to ensure a successful renovation project.
Read more
Modern living luxury homes 101 with Tobb Group
The demand for modern living luxury apartments reflects a shift in our lifestyles — people want a place where they can work and play in one convenient and comfortable setting.
Read more